|
HOME | FREE BEGINNING GUITAR LESSONS | FREE VIDEO GUITAR LESSONS BLUEGRASS GUITAR 101 EBOOK | FREE GUITAR TABS | FREE GUITAR CHORD CHARTS |
||||
LINKS TO MY OTHER FREE LESSON SITES: • Mandolin ©2016 Bradley Laird
|
FREE
GUITAR LESSONS - by Bradley Laird
LESSON 3 UNDERSTANDING BASIC CHORD CHARTS
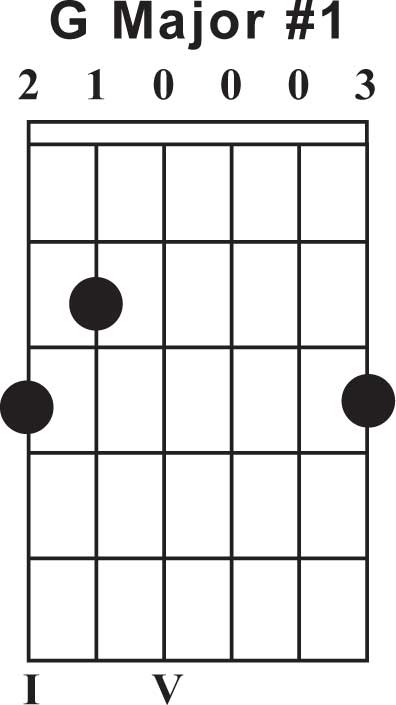
Let me explain the various symbols and markings: 1) The vertical lines represent the strings of your guitar. 2) The horizontal lines represent the frets. 3) The double line at the top represents the nut. 4) Black circles indicate where you place the fingertips of your left hand. 5) Above each string you will see a number. Zero means the string is played "open" which means you do not "fret" the string with your left hand. A number (1,2,3 or 4) means that it is suggested that you use that finger to depress the string shown by the black circle or "dot". 6) At the top, of course, is the name of the chord form. 7) Below certain strings you will see a "I" or "V". Those are Roman numerals for "one" and "five." Those will be the strings played as bass notes by the right hand. Don't worry, I will explain that in a lot more detail coming up. Here is my pickin' buddy, Buddy Ashmore, demonstrating the above chord shape...
Dang, I wish I was that photogenic! Practice smiling at folks just like Buddy and it will carry you as far as learning every note Tony Rice ever played. Nice hat too! (Just a little free bluegrass tip.) Try sticking your 2nd finger (that's your "bird finger" for those of you in Asia who count the thumb as finger #1.) on the 6th string just behind the 3rd fret up from the nut. Arch your finger so that you don't bump any other strings. Then, according to the chart, put your other fingers where they go. Strum your guitar... viola! You did it. Well, you did something. After you fool with that for a while, head on over to Lesson 4 and let me pour some more stuff into that funnel I have metaphorically inserted into the top of your noggin'...
| |||


